
Snowman shelf setter made with wood discs and cardboard
- fatimamholland

- Aug 8, 2025
- 3 min read

Here’s another great Winter project !
The feeling I get when I’m creating these wintery projects really is indescribable!
I just love it!
How adorable is this Snowman Shelf Setter with wooden discs and cardboard!
You don’t really need a lot of items to create this beautiful piece!
You just need to Recycle some cardboard and some wood discs for this project!
It’s amazing what you can create with it!
I absolutely love being able to create something special with leftover items and bring them back to life as something totally different and simply beautiful!
The sky is the limit with what you can create!
This beautiful Snowman piece is perfect for this year’s Winter decor!
So I’m sure you have all you need at your fingertips! so let’s get started !
Supplies You’ll Need:
Cardboard
Wooden discs
Scissors
Paint I used Black, Orange, Red and white you can use acrylic or chalk
Embellishments of your choosing
Hot Glue
Artificial Christmas greenery
Fine glitter
Little buttons
Red and white pipe cleaners
Dixie Belle wax brown
Once you have gathered your items you are ready to put them together!

When you get your wood discs make sure they are 3 different sizes .

I peeled some of the paper off the front of my cardboard piece.

I painted my wooden discs white.

Then I gave the cardboard piece a quick brush of white too.

I cut out some narrow pieces of cardboard for my boarder.

I glued my boarder and snowman down with hot glue.

Here’s the pattern I used for his cute hat!

I glued that on too.

I brushed the boarder with some white.

Then I painted the hat and gave the boarder a quick brush of black too.

I did the details on his face . Keep it simple .
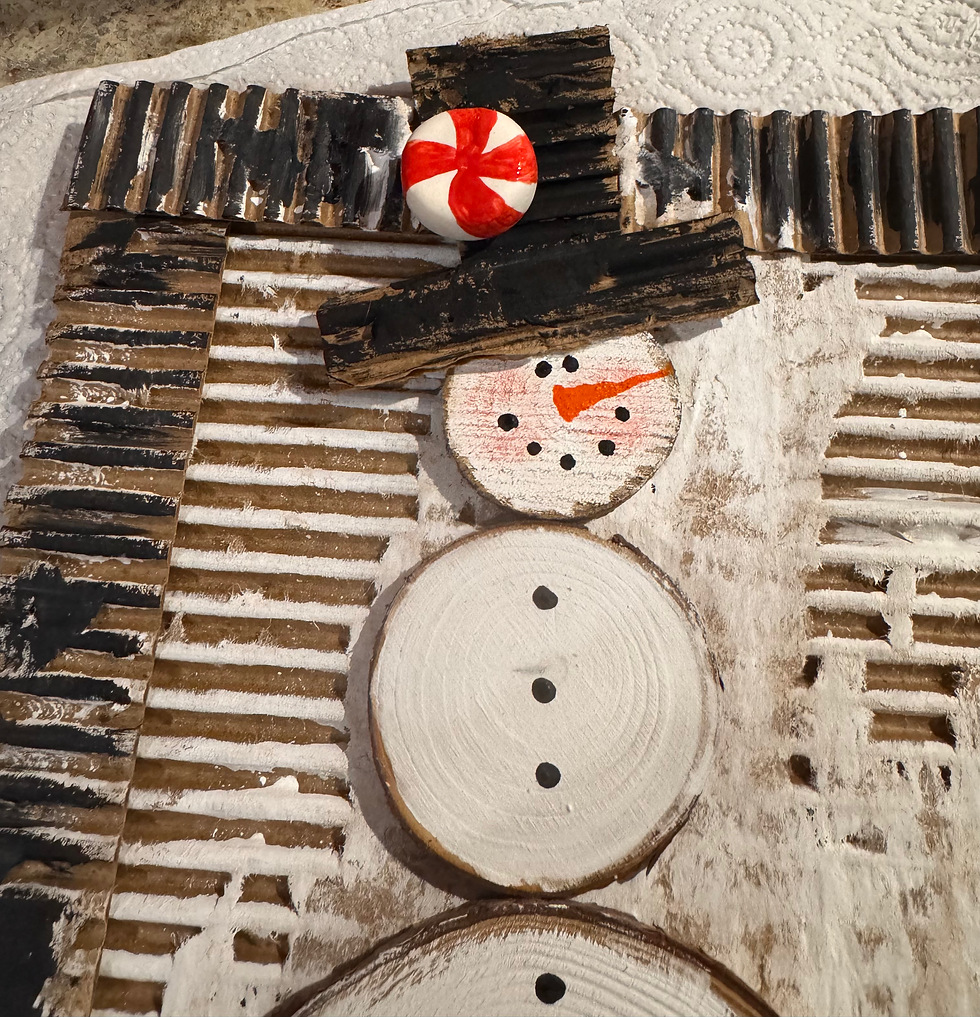
I had made some peppermints awhile back with air dry clay and glued one on his hat ! So cute !

I decided to add a little piece of material across his hat for a band.

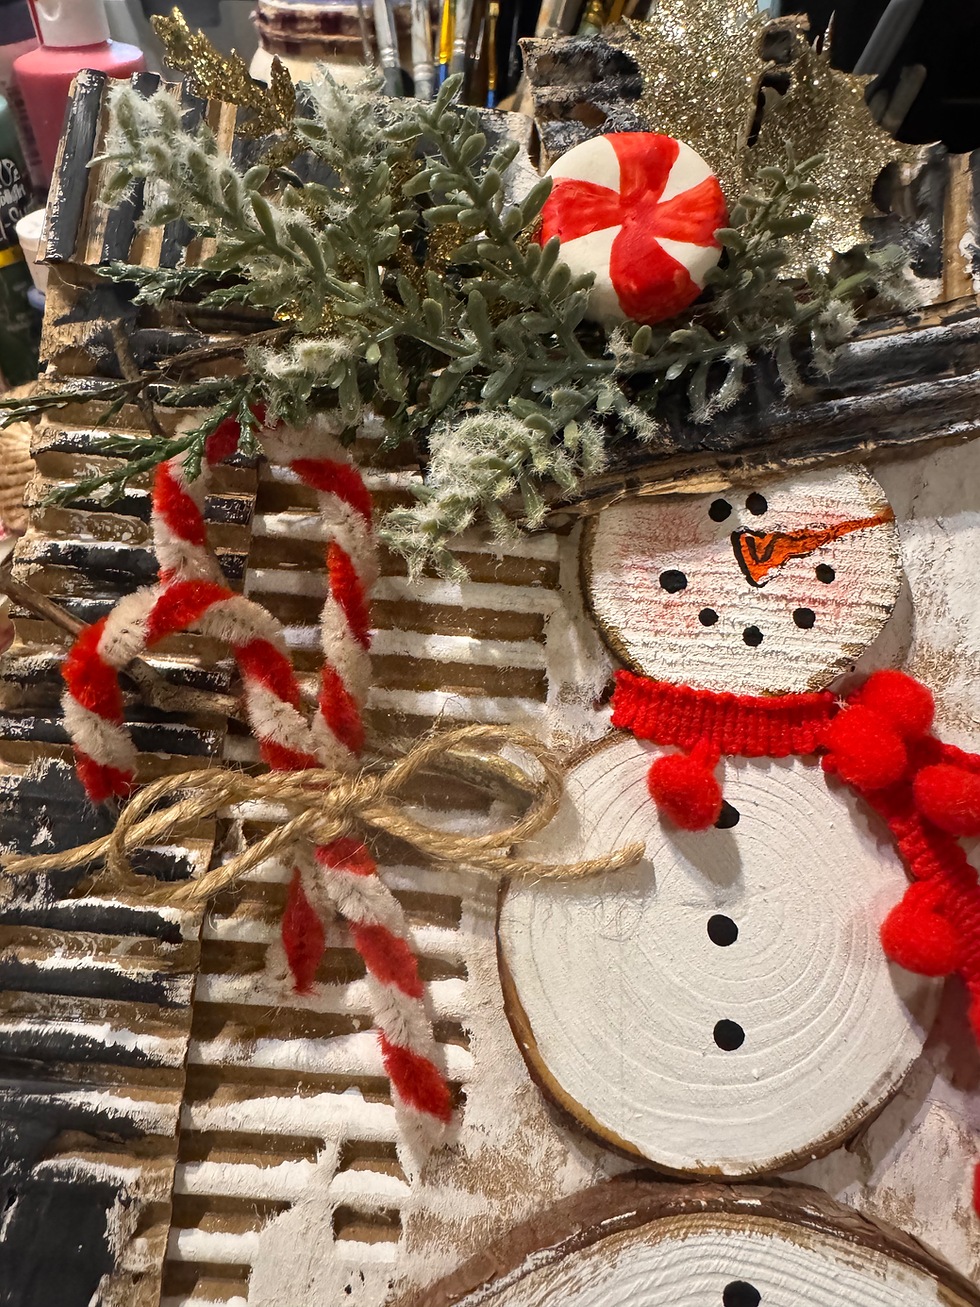
Then I started adding Christmas greenery to embellish it .

I added this adorable red Pom Pom ribbon for his scarf!

Then I got some small branches from my yard for his arms.

I made a couple of candy canes from my red and white pipe cleaners! Glued them together and tied a piece of twine around them.

I added some more greenery to his hat .
Remember it’s the small details that make these creations special!
I am loving how he is coming out!

I had painted dots for his buttons but then decided to actually glue buttons on ! I love that so much more!

I took my Dixie Belle Brown wax and gave it a little grunge look all over.
I also went ahead and splattered white all over it with my old tooth brush!
For the finishing touch a gave it a light spray with my clear sealer and sprinkled some fine glitter!
How fun is this! 😀❤️☃️
Simply adorable!
I just love how this Shelf Setter Snowman with the wood discs and cardboard came out!
Just a little cardboard and a few embellishments and here’s what you have! ☃️❤️
This beautiful snowman piece will look great wherever you decide to display it!
This is such a fun way to add handmade charm to your upcoming Winter seasonal decor!
I’m always so excited to share these creative, budget-friendly ideas with you. I hope you give this project a try and create several of these for your home decor or as a gift for someone special! 🎁
What a beautiful way to decorate and still be on track budget wise!
You don’t have to spend a lot to have fun beautiful items to add to your decor for any season!
It all starts just by using a little imagination and a few supplies!
I’m always trying to create adorable budget friendly projects and this one is another perfect DIY for you to display!
Please make sure you are following us on Facebook for daily inspiration , recipes and crafting ideas!
You can also check us out on YouTube
Brown wax Dixie Belle
Fine Glitter
Wooden slices


Comments